Pen Tutorial Practice Templates

This page contains all the practice templates for drawing with the pen. Here are tutorials for Deneba Canvas™, Adobe® Illustrator®, Adobe Photoshop®, Macromedia® FreeHand® and CorelDRAW®. These tutorials are setup for both Macintosh® and Windows® platforms.

You might ask, "What are Photoshop tutorials doing here in the vector application section?" Using the pen in Adobe Photoshop is virtually the same as using the pen in Adobe Illustrator. Learning pen skills really belongs here with the other vector applications. I have linked the Photoshop section of the web site to these pages for learning the pen.

These tutorials are short and fun. Make sure to download the setup sheet for the application you are using. The setup is very straightforward. Except for Photoshop (which rasterizes the PDF file...turns it into a bitmap), you simply load the tutorial PDF file into the drawing application, then lock the layer containing the template, then add a new layer and draw on that new layer. The reason you keep the template on a locked layer is because the template contains vector objects which can get selected and altered otherwise. Don't worry, it's really simple. All the instructions are in the setup sheets.

The tutorials are setup in sequence starting with the easiest ones. Each one gives you a different skill. By the time you get to the last one you will see how it all comes together. They have been purposely setup to take advantage of keyboard shortcuts so you don't have to return to the tool palette once the pen tool has been selected.

The whole point is to train you to take advantage of the keyboard shortcuts so you will draw faster, smoother and more fluidly.

Download Instructions:

Instructions:

1. First download and install the free Adobe Acrobat® Reader

2. If you wish to view the PDF file only, simply click on the link below

3. To download in Windows®: Place mouse pointer on the link, then right click the mouse.

For Internet Explorer®: "Save Target As..."
For Netscape®: "Save Link as..."
then save it to disk

4. To download in Mac®: Hold the mouse button down for a second or Control + Click and a pop up window will appear.

For Internet Explorer: "Download Link to Disk"
For Netscape: "Save this Link as..."
then save it to disk.
Pen Tutorials For Macintosh® and Windows
Canvas 5-7 Illustrator 7-9 Photoshop 5 FreeHand 8-9 CorelDRAW 8-9
Setup Sheet

setupcnv.pdf
pdficon.gif
34.20K

setupai.pdf
pdficon.gif
15.20K

setuppsd.pdf
pdficon.gif
15.60K

setupfh8.pdf
pdficon.gif
18.50K

setupcdr.pdf
pdficon.gif
41.70K

Tutorial 1

tem1cnv.pdf
pdficon.gif
9.33K

tem1ai.pdf
pdficon.gif
3.38K

tem1psd.pdf
pdficon.gif
3.49K

tem1fh8.pdf
pdficon.gif
9.45K

tem1cdr.pdf
pdficon.gif
10.00K

Tutorial 2

tem2cnv.pdf
pdficon.gif
5.48K

tem2ai.pdf
pdficon.gif
9.03K

tem2psd.pdf
pdficon.gif
5.42K

tem2fh8.pdf
pdficon.gif
5.35K

tem2cdr.pdf
pdficon.gif
5.50K

Tutorial 3

tem3cnv.pdf
pdficon.gif
6.67K

tem3ai.pdf
pdficon.gif
8.76K

tem3psd.pdf
pdficon.gif
6.20K

tem3fh8.pdf
pdficon.gif
6.19K

tem3cdr.pdf
pdficon.gif
6.73K

Tutorial 4

tem4cnv.pdf
pdficon.gif
4.36K

tem4ai.pdf
pdficon.gif
10.10K

tem4psd.pdf
pdficon.gif
6.80K

tem4fh8.pdf
pdficon.gif
6.87K

tem4cdr.pdf
pdficon.gif
4.33K

Tutorial 5

tem5cnv.pdf
pdficon.gif
3.68K

tem5ai.pdf
pdficon.gif
6.22K

tem5psd.pdf
pdficon.gif
3.69K

tem5fh8.pdf
pdficon.gif
3.73K

tem5cdr.pdf
pdficon.gif
3.82K

Tutorial 6

tem6cnv.pdf
pdficon.gif
32.60K

tem6ai.pdf
pdficon.gif
21.30K

tem6psd.pdf
pdficon.gif
21.10K

tem6fh8.pdf
pdficon.gif
32.00K

tem6cdr.pdf
pdficon.gif
31.80K

Complete Set
Macintosh

temcnv.sit

84.60K

temai.sit

61.90K

tempsd.sit

56.00K

temfh8.sit

73.00K

temcdr.sit

92.00K

Complete Set
Windows

temcnv.zip

82.20K

temai.zip

60.60K

tempsd.zip

53.90K

temfh8.zip

70.70K

temcdr.zip

89.10K

Keyboard Shortcuts For The Pen Examples

The idea behind the keyboard shortcuts in Adobe® Illustrator®, Adobe Photoshop® and Macromedia® FreeHand® is so you can draw paths in a fluid manner with as few interruptions as possible. Ideally, you would draw as fluidly as if you were actually using a pen or pencil. The previous page described the hand positions with the keyboard and mouse. This page describes how it is done. The next page gives you practice templates for each application.

While the pen tool is selected and you are actively drawing a path, pressing the following keys will bring up a different tool:

For Adobe Illustrator or Adobe Photoshop:

Macintosh® Windows® Function
Command
Option
Shift
Ctrl
Alt
Shift
Selects the last selection tool
Selects the Convert Direction Point Tool
Constrains angle to 45° increments

For Macromedia FreeHand:

Macintosh Windows Function
Command
Option
Shift
Ctrl
Alt
Shift
Selects the Pointer Tool
Places a corner point
Constrains angle to 45° increments

Basically the functions of these keys between the Adobe applications and Macromedia FreeHand are the same. There is only a slight difference in the use of the Alt or Option key to create a corner point. In Illustrator and Photoshop, all newly placed points with control handles are smooth points by default. The Convert Direction Point Tool is used to change a smooth point to a corner point with handles. In FreeHand, you can drag out control handles for a corner point when you first place it.

Brief Example - Adobe Illustrator

In the following example, three tools are used without returning to the tool palette to change tools:
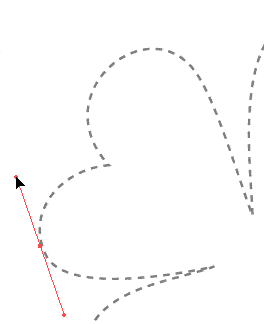
1. Drag out the first point
clover1a.gif

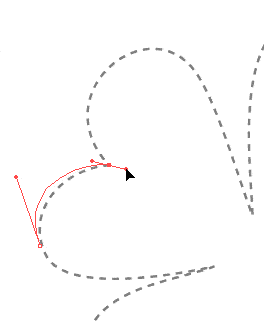
2. Drag out the second point. The first curve is off, now. clover2a.gif

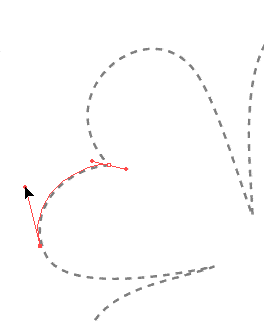
3. Press Ctrl (Windows) or Command (Macintosh) and use the Direct Selection Tool to drag back the first curve. clover3a.gif

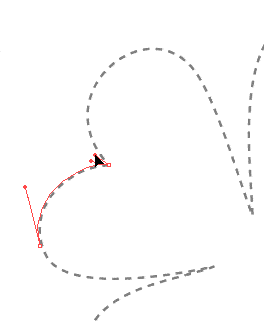
4. Press Alt (Windows) or Option (Macintosh) to bring up the Convert Direction Point Tool and drag the second point's handle (changing it from a smooth point to a corner point) to redirect the next curve. clover4a.gif

5. Place the next point and continue drawing the path. clover5a.gif

Pen Cursors

The pen cursor helps you identify where you're at when drawing paths. You need to know when you are over a point so you can append to an open path (restarting the path) or when you are over a point so you can close a path. You also need to know what the cursor looks like to start a new path so you don't inadvertently keep adding to an existing path or vice versa. These are the most important cursors. Their functions are identical between Adobe Illustrator 7 and 8, Adobe Photoshop 5 and Macromedia FreeHand 8. The chart below describes these cursors.

Start
New
Path

Continue
Adding
To Path

Restart
Open
Path

Close
Path


Illustrator 7 / 8 cursai1.gif cursai2.gif cursai3.gif cursai4.gif


Photoshop 5 curspsd1.gif curspsd2.gif curspsd3.gif curspsd4.gif


FreeHand 8 cursfh81.gif cursfh82.gif cursfh83.gif cursfh84.gif


Deneba Canvas™

The Curve tool is used for drawing Bezier curves in Deneba Canvas. Some of the various cursors are described below.

Add Points To Path


Pointer Directly Over an Anchor Point. Next Click Closes Path

Placing Straight Segments

Placing Segments Constrained To 45°

Deneba Canvas curscnv1.gif curscnv2.gif curscnv3.gif curscnv4.gif


CorelDRAW®

CorelDRAW 8 handles line drawing slightly differently. You have a choice of tools. Their functions are listed below.

Freehand
Tool
Start
New
Path

Freehand
Tool
Restart
or Close
Path

Bezier
Tool
Start,
Continue
or Restart
Path

Bezier
Tool
Close
Path


CorelDRAW 8 curscdr1.gif curscdr2.gif curscdr3.gif curscdr4.gif